

The DIY TV cart is a very simple project for those who have beginner level knowledge working with wood.
I went to the hardware store very early in the morning after dropping off my daughter at school.
Quickly gathered all the materials I needed for the cart. Casters, Liquid Nail, plywood and wood screws. I have paint at home so skipped the paint.
Purchased a plywood used for construction. It does not matter to me that it has ruff texture, love texture , but it can be sanded an the texture becomes smother.
At the hardware store; Asked if they can make several cut for me ( that way saves me time, work and the allergy that I'm going to get if I do it myself, plus the cuts are perfectly straight ). Then went home to start my project. And it came out just As I wanted it basic functional, movable around the house.
If you like to construct this simple TV cart here are the instructions.
General Instructions
- When you go to purchase your panel make sure that is straight.
- Wear safety glasses and take the necessary precautions to work in a safely.
- Work on a clean leveled surface, free of imperfections or debris.
- Check for square after each step.
- Pre-drill holes before attaching with screws
- Use glue with screws for a stronger hold.
- Wipe excess glue off bare wood for stained projects, as dried glue will not take stain.
- Paint or stain in your favorite color.
- Be safe, have fun, and ask for help if you need it.
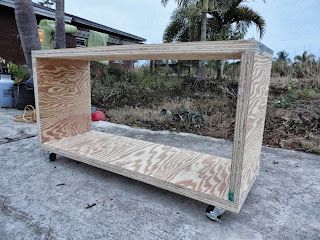
Total Dimensions 20"x 48" x 18"
Total cost About $70 without finishing (already had it).
Total cost About $70 without finishing (already had it).
4 pieces of 20'' X 48'' X 3/4
2 pieces of 20" X 16" X 3/4
2 pieces of 20"X 14" X 3/4
4 rubber casters
2 tubes Liquid Nail
16 wood screws 1 1/2 "
16 wood screws 1"
Glue 2 pieces of the 20'' X 48'' X 3/4 and then the other two.
Gather 1 pieces of the 20" X 16" X 3/4 and glue with the piece of 20"X 14" X 3/4 you will end with a
Gather 1 pieces of the 20" X 16" X 3/4 and glue with the piece of 20"X 14" X 3/4 you will end with a

Finishing Instructions
Preparation Instructions:
- Fill all holes with wood filler and let dry. Apply additional coats of wood filler as needed.
- Let the wood filler dry completely.
- Sand the project (when sanding it should be always done in the direction of the wood grain with 120 grit sandpaper).
- Remove all sanding residue.
- Wipe project clean with damp cloth.
- Finish that I used to give a splash of color to my project was: acrylic paint in rainbow color. Or if you are matching it to your furniture using Stain.
HAVE FUN AND CREATE!


No comments:
Post a Comment